Harbor Breeze is a great brand of ceiling fan that you can use indoors and they have the capacity to generate maximum airflow at your place. Especially in hot scorching days of summers.
If you want to get advice, tips and guides in terms of installation, please read this entire article.
There are some of the models that we have discussed below. You need to ensure that you have the right model when it comes to installation and you can also check our manuals page that has PDF manuals for your fan.
What is the Ceiling Fan size for you?
In general, you can use these recommendations for ceiling fan size keeping in view your room size:
- If the largest room has dimensions of 12 feet or less, use a 36-inch ceiling fan.
- If the largest room has dimensions of 12 feet to 15 feet, use a 42-inch ceiling fan.
- If the largest room has dimensions of 15 feet to 18, use a 52-inch diameter ceiling fan.
Steps to Install Your Harbor Breeze Ceiling Fan
If you want to make sure that your fan is mounted to the ceiling securely and for security measures, you need to go through all the instructions came with your fan.
Since ceiling fans can be used to get rid of existing light fixtures, the wiring to the fan should already be done. It is easy to install but the only thing you need to do is to focus on in the instructions.
If it requires additional wiring in order to install it and you do not know about the wiring, get help from a certified electrician. All wiring should abide by local and national codes.
When you are working with power always:
- Switch OFF power from the main fuse box (or circuit box) that sends the electricity to the fixture or the room you are going to work on.
- To make sure the electricity is OFF, test the wires.
- Turn OFF the wall switch by turning it into the OFF position.
- All electrical connections must follow the local codes. Check with local authorities to find out if you need a permit.
- If there is a problem or confusion, get help from a qualified electrician.
- Do not use bulbs that has more wattage as specified for this fixture (if applicable).
A Word of Caution:
To minimize the risk of electric shock or fire, avoid using the fan with any solid-state speed-control device or variable speed switch unless it is specifically made to use with the fan.
Do not use a plastic electrical box for mounting. A securely fastened metal box must be used.
To get the safety, warning and caution information, the best place is to read the manufacturer’s instructions.
Mounting Options for Your Harbor Breeze Ceiling Fan
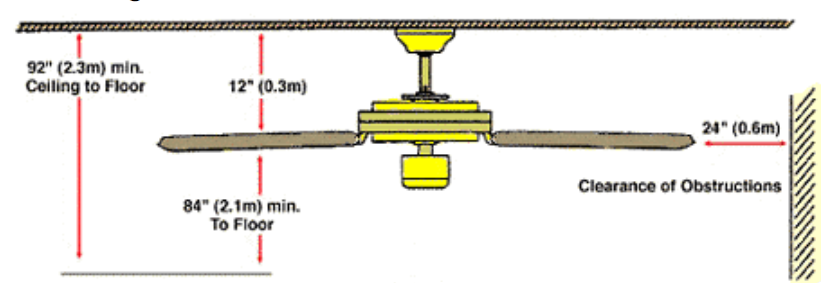
You must mount the Harbor Breeze ceiling fan blades at least 7 feet above the floor.
To get the optimum efficiency, there should not be any hurdle within the 24 inches of the blade tips.
A correct outlet or junction box is needed to attached it securely to the building structure. Change the old one with one that has a label that says approved for ceiling fans or ceiling-suspended paddle fan installation.
The box and its support should have the ability to support the weight of the fan when it is moving. Get the installation hardware suggested by the junction box manufacturer for safety.
Fans more than 35 pounds in weight, with or without accessories, need additional support independent of the outlet box. If you need any replacement or additional parts from the company then read our article on: Harbor Breeze Replacement Parts.
Secure the new box to a brace available between the ceiling joists. If a 2-by-4 wood brace between the joists is not available but you can access the framing through the attic, you need to add a brace.
Otherwise, you have to install an expandable metal ceiling-fan hanger bar. These should be placed either from below the ceiling or from the attic, through the rough opening. Use a U-bolt in order to secure the box to the bracket.
How to Install the Mounting Bracket for Your Harbor Breeze Ceiling Fan
A properly installed mounting bracket will make the ceiling fan safe. To install it correctly, you need to follow these steps:
1: Remove the Motor Screws of Your Harbor Breeze Fan
The first step is to remove the fan motor screws. You will use these screws later in order to secure the blade arms to the motor.
2: Removing Mounting Bracket
The second step is to remove the mounting bracket from the fan canopy.
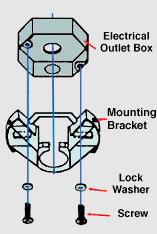
3: Secure Mounting Bracket to Ceiling Electrical Box
Use the mounting screws and lock washers in order to secure the mounting bracket to the ceiling electrical box.
If the fan has a J-hook, use the J-hook to install the mounting bracket toward the floor. The weight of the fan motor housing will be supported by the hook to allow hands-free wiring installation.
4: Electrical Wires
Use the center hole of the mounting bracket to pull the electrical wires through it.
5: Make a decision on Close Mount or Downrod Installation
Now, if your fan has 3-mounting options, you will have to make a decision whether to install it flush mount (close-mount) or downrod. Downrod installations support both angled and standard applications.
How to Install a Downrod for Your Fan
A downrod helps the fan to be suspended from high ceilings and can be used as per your preference as they are available in different lengths to accommodate your home’s architecture.
1: Installing Downrod
The first step is to install the downrod into the mount with the ball end toward the ceiling.
2: Electrical Wiring
Thread the lead wires (the colors can be blue, white, and black) through canopy as well as downrod. Make sure that you do not pull the electrical wires.
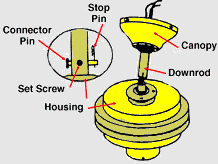
3: Insert Downrod into Collar Yoke
To match the holes, insert the downrod into the collar yoke and rotate until it matches. After that, insert the connector pin using the holes, and secure it with a cotter pin. Avoid damaging or cutting the fan wires.
Bend the legs of the cotter pin which are two in number to make sure that the connector pin doesn’t slip out.
4: Affix Downrod to Motor Assembly
The next step is to affix the hanger and downrod to the motor assembly and to do it, you need to tighten the set screws on the side of the downrod. Some fans come with two set of screws, while some of them come with lock nuts for the set screws.
5: Hanger Bracket
Insert the ball into the hanger bracket. The tab confronting the hanger bracket opening must fit into the slot on the ball. Make the necessary wire connections.
6: Attach Canopy
After making the secure connections and carefully tucking the wires into the outlet box, the next thing is to ensure the tab available in the bottom of the hanger bracket is fitted in the groove of the hanger ball. To permanently attach the canopy with the supplied screws, slide the canopy up the hanger bracket.
If you need more information on it, you can download the Harbor Breeze Ceiling Fan Manual.
How to Attach Your Harbor Breeze Ceiling Fan Blades
Use the screws and washers provided with the fan to mount each blade bracket to the fan blade. Before you tighten them, start all the screws and then tighten each of them.
Repeat the process for the rest of the blades. Follow the same procedure in order to mount each bracket/blade assembly to your fan.
The one thing you need to ensure is that all screws are tightened securely.
In order to customize your ceiling fan, read this helpful post on: Harbor Breeze Ceiling Fans & Accessories to explore the best customizable options.
How to Add a Light Kit to Your Harbor Breeze Ceiling Fan
If have bought a fan with a light kit, the wiring may already be there, needing only that you install the bulbs and globes to it. in some cases, however, you may have to do the wiring for the light kit too.
1: Removing Ceiling Fan Cover Plate
Remove the switch-housing cover plate from your unit.
2: Removing Plug
From the center of the cover plate, remove the plug.
3: Feeding Light Kit Wiring
Use the wires both blue and white to feed the light kit using the holes in the cover plate and screw them tightly to the lighting fixture to avoid the vibrating loose.
4: Electrical Wiring for Light Kit
Find the white and blue wires which are available in switch housing labeled for light. Use the wire connectors in order to connect them to light kit. White wire to white and black wire to black.
Use the electrical tape to secure the connections to stop the wire connectors from vibrating loose while working.
5: Attaching Light Kit to Housing
Push the wires into the switch housing after making the connections carefully, and attach the lighting fixture to the switch housing by using the available screws.
If there is a problem and you are not able to follow these instructions, you need to read your manual or get help from a certified electrician.
How to Install a Harbor Breeze Flush Mount Ceiling Fan
Some fans can be mounted without using a downrod. This type of mounting will keep the fan closer to the ceiling.
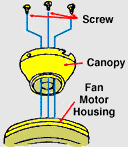
1: Remove Screws
The first step is to remove the larger screws and lock washers located at the top of the decorative fan motor housing.
2: Secure Canopy
Use the same screws to secure the canopy to the housing.
3: Hang Ceiling Fan
If applicable, use the J-hook to hang the fan and use one of the holes from the top of the canopy.
4: Wire Connections
Make the necessary wire connections. Here are the colors to find out the wire’s purpose: blue wire is for light, black is the hot wire that is for the fan, white is used for fan as well as light kit and green color is for ground.
In all cases, you need to secure the exposed wiring inside the wire connectors. After completing the wiring, gently push them into the outlet box.
Once you have made the connections and pushed the wires into the electrical box, on the mounting plate, remove the canopy from the J-hook.
5: Permanently Attach Canopy
Attach the canopy to the mounting plate permanently with the given screws.
Harbour Breeze Fans are known as the best fans in ceiling fan industry and we hope that you will share this article with your friends.
We would appreciate your help if you link to this post and help other people.

John Carter is a DIY expert and home improvement specialist with over 15 years of experience in woodworking, home repairs, and renovation. As the founder of DIYMastery.com, he provides step-by-step guides, tool reviews, and expert tips to help homeowners tackle projects with confidence. Featured in Better Homes & Gardens, DIY Network, and Popular Mechanics, John is dedicated to making DIY simple, safe, and accessible.