If you are using a ceiling fan, at some stage, you may have to face a problem with the functions of your Harbor Breeze ceiling fan, and one of the major problems that the users need to face is the ceiling fan is running and the light kit not working. In some cases, Harbor Breeze ceiling fan not working and light works. Being a DIY person, I did my research to gather as much information on the question of why your Harbor Breeze Light kit is not working and have included my expert opinion in this article.
If your Harbor Breeze Light Kit is not working then the first step you need to take is to check if the light bulbs need replacing, check if the light kit has wiring issue and needs rewiring and find out if there are any loose wires connecting the light kit to the housing.
It is a short answer to your question but let’s have a look at it in detail to cover each possible situation. But take some precautions. If you do not have any technical or electrical experience, it is my advice not to open your Harbor Breeze ceiling fan. If you have opened it and going to work on electrical parts then the first step should be to turn off the circuit breaker and switch.
Check If Bulbs are Burnt Out
The first thing to start with is the light bulbs. Check them to find out if the filament is broken. When you look at them they may appear normal but on close examination, you will be able to see the broken filament. You might be thinking to change the bulbs with standard light bulbs from your nearby store, this ideal will not be in your favor as ceiling fan light bulbs are made specifically to install in your ceiling fan in order to bear the vibrations of the motor and spinning blades.
Check If Wires are Burnt Out
A quick method to find out if your light kit wires need to be replaced is by looking at the burn marks available on the socket or light bulb. These burn marks can occur when there is a short in the wires. When you open your ceiling fan to change the wires you must switch off the breaker first to turn off the power. If the burn marks are available on the socket you might consider it easier to replace the light kit. Check the related article on: Harbor Breeze Replacement Light Kits
Check If there are loose Wires to Tight Them
You have to get access to the wiring of the lighting fixture. Again, do not forget to turn off the power from the breaker. A quick tip to make sure that your power is turned off is by leaving the ceiling fan moving at low speed. Turn off the breaker from the breaker box which is sending power to the fan. The fan should stop working to confirm it. If the unit has stopped moving it means that you have turned off the right breaker. Check for loose connections as well as loose wires. If there are any loose connections, you may have to use new wire nuts.
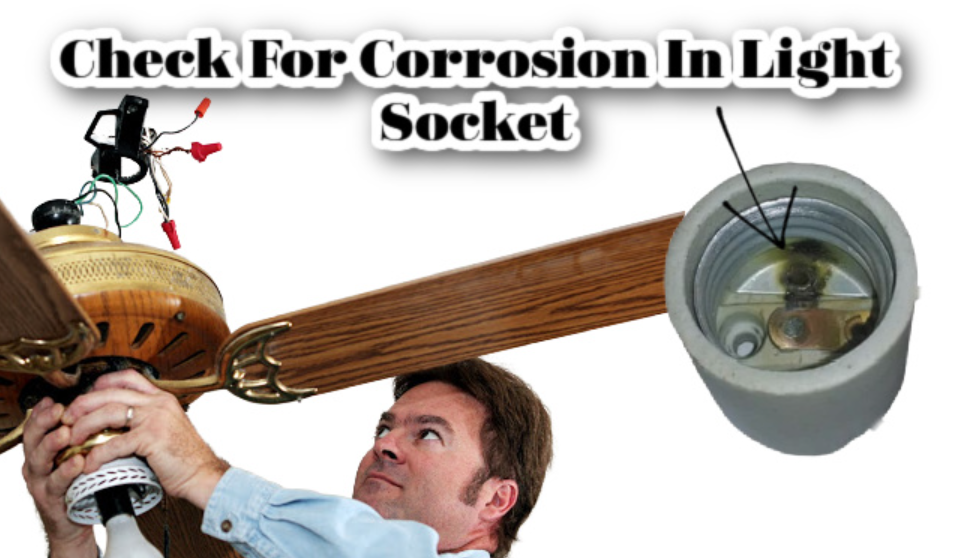
Examine Light Socket for Corrosion
Remove the light bulb in order to expose the socket but you should do it after turning off the power from the breaker. A light socket brush should be used to remove any corrosion. Use a dry cloth to wipe the socket and get rid of debris. Install the light bulb and make sure that it is fastened but do not over-tight it.
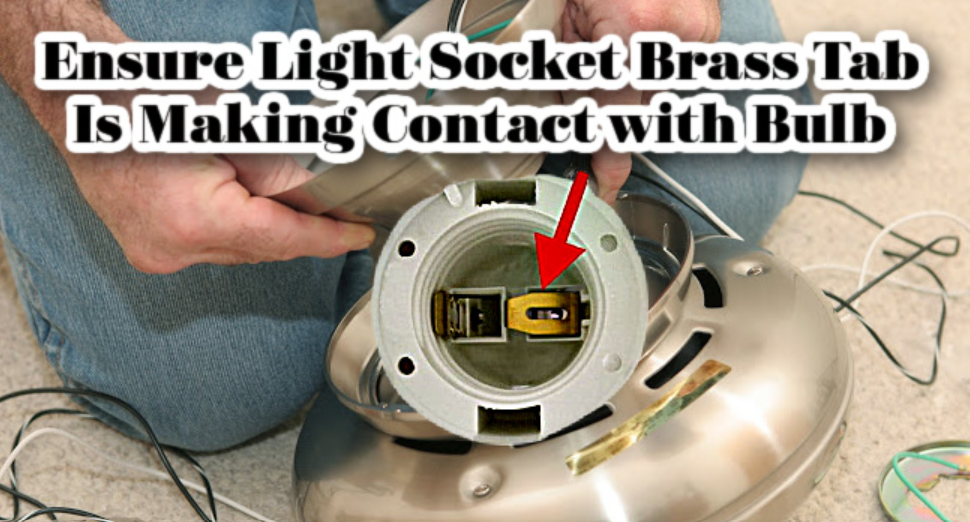
Check to Make Sure Light Socket Metal Tab is in Contact with Light Bulb
After turning off the power from the breaker, uninstall the light bulb from the socket. Do it with the help of a small flathead screwdriver pull the metal tab up a little in order to make contact with the bulb when you are screwing it back in.
Replace Pull Chain if they are damaged
If your ceiling fan supports a pull chain, it means you are using an older model, then you will have to change the pull chain. Some pull chains will turn off/on the fan along with lights. To learn about how to find and get replacement parts, read our post on: Harbor Breeze Ceiling Fan Replacement Parts. To learn about the procedure of pull chain replacement, check your manual. Our website also has manuals that you want, you can get them by searching for them.
Reset The Harbor Breeze Ceiling Fan Remote Control
If your Harbor Breeze ceiling fan lights are turning off and on from a remote, you may have to replace the batteries of the remote. Turn off your remote and get rid of old batteries. Wait for at least 10 seconds and change the old batteries with new ones.
Check and Ensure Power is Reaching the Ceiling Fan
Check another socket to find out if the room has power. If other power outlet within the room is not receiving power then you need to inspect your power box and reset the breaker of the room in which you have installed the ceiling fan.
Tip: Use gloves before you start replacing the bulbs. If you will use your bare hands it may leave the oil on the bulb that is on your hands and results in a short out.
Here is a simple table that can help you to find out why your Harbor Breeze light kit is not working.
| Fix | Indication |
| Replace Light Bulbs | Examine the burn marks on the bulb |
| Replace Burnt Out Wires | Examine the burn marks on bulb |
| Tighten the Loose Wires (if any) | Check loose wires and connections. Replace wire nuts if connections are loose |
| Clean Light Socket | Inspect Light Socket for Corrosion |
| Lift Light Socket Metal Tab | Check to make sure that Light Socket Metal Tab is Making Contact with Light Bulb |
| Replace Damaged Pull Chain | Examine the Pull Chain if they wear out |
| Reset The Harbor Breeze Ceiling Fan Remote Control | Replace the batteries in ceiling fan remote control (if needed) |
| Reset Breaker | Replace the batteries in the ceiling fan remote control (if needed) |
Whenever dealing with electric work, please get help or consult a qualified electrician if you are not confident about electrical wiring. We do not encourage the users to do any electrical work who are not familiar with the electrical work or qualified for it. This article contains information that can help you to find the issue that may be causing your light kit to malfunction.
Why Does My Ceiling Fan Work But the Lights Don’t
It can be a frustrating problem when you see that your light bulbs are not burnt out and working fine when they are out of your ceiling fan.
If your ceiling fan works but the lights don’t then the first thing you need to do is to examine any loose wire connections from the wall switch to the lighting kit. Broken pull chains with damaged sockets can also stop the lights from functioning, so you need to check and replace them if they are damaged.
Use a noncontact voltage meter inside the light socket in order to inspect the light socket for damage. But before you do that, switch off the power from the breaker.
Firstly, remove the bulb from the socket and use the noncontact volt tester inside the socket. To ensure the voltage, the light on the volt tester will light up. If it does not light up then you can clean the socket.
If the volt tester lights up then it means you have not switched off the right breaker. Before you get started, you need to confirm that the power is turned off from the correct breaker.
Wipe any corrosion that may have built up with the help of a light socket cleaning brush.
Carefully pry up the small metal tab in the socket by using a screw driver to make sure that it will engage with the bulb when the light bulb is installed.
If you are still getting issues with lights not working then the next thing is to examine the light kit wiring to make sure they are secured and connected properly. Switch off the right breaker first before you start working on wire connections. Tighten the loose connections using the new wire nuts.
After using all of the above steps, if you are still getting no light then change the pull chains. To replace your particular pull chain, use your manual to find out the right process. You may have to get light kit replacement for your Harbor Breeze fan if you are unable to solve the issues. For that, you can go to this article on Harbor Breeze Replacement Parts.
How Do You Troubleshoot a Harbor Breeze Ceiling Fan?
You can troubleshoot your Harbor Breeze ceiling fan by following a few steps below before starting any repairs.
To troubleshoot your Harbor Breeze ceiling fan, the first step is to find out if the power is reaching the fan and ensure that reversing switch is not in-between positions but is in either reverse or forward direction. If there is a groaning sound coming from your unit when it is trying to turn then you need to replace the motor.
First, you need to check the Harbor Breeze warranty on the motor as it offers a limited lifetime guarantee on it and you may get a replacement without paying anything. To see more about the warranty information, check this post on Harbor Breeze Fan Parts.
To learn about how to install your Harbor Breeze ceiling fan, read our article on Harbor Breeze Fan Installation
If you are not able to fix your remote control then you should read our article on Harbor Breeze Ceiling Fan Remote

John Carter is a DIY expert and home improvement specialist with over 15 years of experience in woodworking, home repairs, and renovation. As the founder of DIYMastery.com, he provides step-by-step guides, tool reviews, and expert tips to help homeowners tackle projects with confidence. Featured in Better Homes & Gardens, DIY Network, and Popular Mechanics, John is dedicated to making DIY simple, safe, and accessible.